Showing posts with label how-to. Show all posts
Last week I decided to move from the old, outdated by secure blackberry device to my cool new smartphone G2. The first thing to do when moving to a new mobile device is transfer/copy/import contacts.

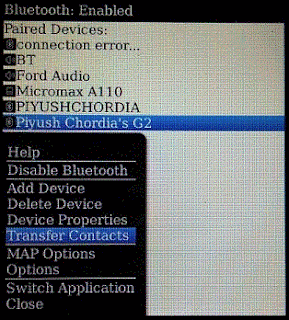
 Interestingly, Even though I'm a programmer by profession, I just couldn't figure out how to transfer contacts from my Blackberry Pearl to G2 - Android smartphone. So I decided to pair both these devices using Bluetooth. After pairing, both my devices were now connected. Pressing the options after selecting G2 device on my Blackberry phone, showed up the lifeline - Transfer contacts. WOW.
Clicked the Transfer contacts options, my G2 poped up a message saying "pcclm wants to send you Phonebook-1.vcf (22.64KB), Accept the file ?" Ofcourse, I can't reject this ...

Accept the file transfer, then on your android device select the file from the Bluetooth downloads folder. Click on the file and done. All your contacts are now saved on new Android smartphone. Simple.

Steps:
1. From the BlackBerry home screen, click on: Options >> Networks and Connections >> Bluetooth Connections. Turn it on.
2. In "Paired Devices", click on "Add a new device", then click on "Search" and your Android should be detected.
3. Select your Android device and click on Submit to prompt your device.
4. Now on your BlackBerry device goto "Paired devices",  select your Android phone.
5. Press the BlackBerry button (options menu) and select "Transfer contacts"
6. Authorize the Bluetooth access on the Android device and wait for the transfer to be completed.

Transfer contacts from Blackberry to your Android smartphone

IBM recently ported the Tivoli Endpoint Manager server from Windows to Linux. With the new release of TEM 9.0, server component of TEM can now be installed on RHEL 6.1 and above with IBM DB2 10.x as the backend database.

In order to explore the new features and capabilities of IBM Endpoint Manager 9.0,  lets quickly create a POC image. Before you start creating a POC image, its recommended to read these tutorials: How to create a YUM repository from an ISO image or mounted CD and Installing TEM 9.0 on Linux

You may download the TEM Linux Server installer from http://software.bigfix.com/download/bes/90/ServerInstaller_9.0.649.0-rhel.tgz . This archive doesn't contain the installer for IBM DB2 10.x. For the purpose of demonstration ( exploring TEM features or creating a quick POC ) , you can download the  FREE version of DB2 from http://www.ibm.com/developerworks/downloads/im/db2express/index.html . Ensure that you download the Linux 64-bit version of IBM DB2 10.1.2 Express-C edition. DB2 Express-C is a full function DB2 data server available for download, and deployment at no charge.

Create a VM with RHEL6.1 (  RHEL 6.2 , RHEL 6.3 are also supported ) typical installation.
Ensure that a valid hostname and IP is assigned to the VM.
Now configure the YUM repository as mentioned here
Install the per-requisite packages for TEM:
#yum install audit-libs.i686 libselinux.i686 cracklib.i686 libaio compat-libstdc++-33 pam.i686 libstdc++.i686 cyrus-sasl-lib.i686
Note: Since TEM Server is 32-bit, ensure that 32-bit compatibility libraries are installed - without x86_64 in the file name.

Now extract the downloaded DB2 package, and run the db2prereqcheck utility. Check for failed errors and warnings.
 Before installing DB2 10.1.2 Express-C edition, install the required packages on RHEL6.1 :
#yum install ibsim ibutils libcxgb3 libibcm libibmad libibumad libipathverbs libmthca libnes rdma sg_persist sg3_utils
Note: Since DB2 is 64-bit, ensure that 64-bit libraries are installed - with x86_64 in the file name.
Shown below the list of dependencies:
Once the required packages are installed, you can proceed to installation of IBM DB2 10.1.2 Express-C edition. Run the db2setup script from the extracted location of DB2 package. Enter default values and proceed with the DB2 installation. Refer this ppt for detailed install steps:
Now install TEM 9.0 as per the steps mentioned here.
I've tried installing the Evaluation version of TEM 9.0 for Linux on RHEL 6.1 (Santiago) with Free version of IBM DB2 10.1.2 Express-C and it works perfecting fine. Good for creating Proof of Concepts and customer demos. This installation appears to work on CentOS 6.3 also, although it is not supported by IBM.


Create a POC image using IEM 9.0 on Linux with Free DB2 10.1.2 Express-C Edition


Every time I work on YUM,  I can visualize this picture, Yamdoot - the messenger of death. Haha...

The Yellowdog Updater, Modified (YUM) is an open-source command-line package-management utility for RPM-compatible Linux operating systems. Many times a user want's to install a particular version of RPM or upgrade an existing RPM installation, but this may not be as simple as just installing a .rpm file. This may require resolving the dependencies of a RPM and then deploying the actual RPM. Inorder to avoid this mess, one can use YUM tool/command.

Lot of RPM packages come bundled with the CD/DVD or ISO image.  We can point the yum tool to the mounted CD/DVD/ISO image and let it figure out the required dependencies and installation of required RPMs.

Here's and example of dependencies:

[root@localhost Packages]# yum install compat-libstdc++-33 pam.i686
Loaded plugins: product-id, refresh-packagekit, subscription-manager
Updating Red Hat repositories.
Setting up Install Process
Resolving Dependencies
--> Running transaction check
---> Package compat-libstdc++-33.x86_64 0:3.2.3-69.el6 will be installed
---> Package pam.i686 0:1.1.1-8.el6 will be installed
--> Processing Dependency: libcrack.so.2 for package: pam-1.1.1-8.el6.i686
--> Processing Dependency: libaudit.so.1 for package: pam-1.1.1-8.el6.i686
--> Processing Dependency: libselinux.so.1 for package: pam-1.1.1-8.el6.i686
--> Running transaction check
---> Package audit-libs.i686 0:2.1-5.el6 will be installed
---> Package cracklib.i686 0:2.8.16-4.el6 will be installed
---> Package libselinux.i686 0:2.0.94-5.el6 will be installed
--> Finished Dependency Resolution

Dependencies Resolved

================================================================================
 Package                    Arch          Version               Repository
                                                                           Size
================================================================================
Installing:
 compat-libstdc++-33        x86_64        3.2.3-69.el6          cd        183 k
 pam                        i686          1.1.1-8.el6           cd        659 k
Installing for dependencies:
 audit-libs                 i686          2.1-5.el6             cd         58 k
 cracklib                   i686          2.8.16-4.el6          cd         70 k
 libselinux                 i686          2.0.94-5.el6          cd        107 k

Transaction Summary
================================================================================
Install       5 Package(s)

Total download size: 1.1 M
Installed size: 3.3 M
Is this ok [y/N]:
As you can see, inorder to install compat-libstdc++-33 and pam.i686,  we need to first install audit-libs, cracklib and libselinux RPMs. This dependency resolution is done by yum to based on the metadata of the RPM to be installed.

Configuring YUM:

First make sure that the installation media is available. If you installed from a CD/DVD then reinserting the media in the drive should result in it being mounted automatically.

If you are using vmware or other virtualization technology, mounting the media or iso should have the same effect. If it does not, it will be necessary to manually mount the media. You should be able to use a command like:

# mount –ro /dev/sr0 /mount
The contents of the CD will then be available in the /mount directory.
To verify the location of the installation media with the device mounted, run the command

# df -k
You should see the media in the list of file systems, e.g.
/dev/sr0 3516418 3516418 0 100% /media/RHEL_6.1 x86_64 Disc 1

To allow yum to use the media as a repository for installation you will need to add configuration info to yum pointing to the install media. Use the following command:
# vi /etc/yum.repos.d/cd.repo
Now type in the following text:

[cd]
name=CD
baseurl=file:"///media/RHEL_6.1 x86_64 Disc 1"
enabled=1
gpgcheck=0
The value for baseurl should match the value of the location of the install media in your file system. If the location string does not contain spaces as does my example, you can omit the quotes. To verify that the data is correct and that the install media is now available for use with yum, at the linux
command line prompt type:
# yum repolist
You should see an entry for repo id "cd" in the output.

Now cd  to the packages directory and install the required package/RPM.

# cd  "/media/RHEL_6.1 x86_64 Disc 1/Packages"
# yum install compat-libstdc++-33 pam.i686

Yum will perform a pre-requisites check and ask you if you want to proceed with the install of the package and any prerequisites. You should enter y to continue. When the install has complete you will get a message to that effect.


How to create a YUM repository from an ISO image or mounted CD

Cryptographic hashes are used for passwords on UNIX operating systems. These cryptographic algorithms need to be strong enough so that they are not compromised.  With the current rate of growth in computer's processing power, time to crack a password is reducing. Use of such algorithms may result in weak password hashes which are more vulnerable to compromise. Most Linux operating systems use MD5 algorithm for cryptographic hashing, which has been severely compromised. Obviously this does not mean MD5 is insecure for password hashing but in order to reduce the chances of  vulnerabilities a more secure and robust algorithm which has no known weaknesses ( like SHA-256  or SHA-512) is recommended.

 So the question is, can we increase the security with the existing hashing algorithms like MD5 ? The answer is yes ... There is something known as "rounds" - a parameter associated with almost every password hashing algorithm.

For example, rounds=85000 means, your computer must compute 85000 hashes every time you log in. This will impose a restriction that an attacker has to compute 85000 hashes for each password he is trying to compromise against the hash in your /etc/shadow. Therefore the attacker will be delayed by a factor of 85000. Most modern computers will take less that 1 second to compute 85000 hashes. If you do not specify the rounds option, the system will use the default value for the algorithm used.
MD5 - default 4096 rounds , SHA256 or SHA512 - default 5000 rounds. Technically the rounds can be shown as :

key = hash(password)
for 1 to 85000 do
key = hash(key)

How to specify rounds option for password hashing ?

Red Hat Enterprise Linux (RHEL)
/etc/pam.d/passwd
password required pam_unix.so sha512 shadow nullok rounds=85000

Oracle Solaris
/etc/security/crypt.conf
md5 crypt_sunmd5.so.1 rounds=85000

Suse Linux Enterprise Server (SLES)
/etc/default/passwd
CRYPT=SHA512
SHA512_CRYPT_FILES=85000

IBM AIX
/etc/security/pwdalg.cfg
sblowfish:
lpa_module = /usr/lib/security/sblowfish
lpa_options = cost_num=10

Note : In above case, if Blowfish algorithm used, number of rounds is to entered as 2^cost_num. So if you want 1024 ( 2^10 ) rounds , you should specify the setting as BLOWFISH_CRYPT_FILES=10. The valid value of cost_num is an integer between 4 and 31, inclusive.  While playing around with this setting, I entered value of cost_num as 31 , and when I tried to change password for root, the process was in progress for more than 4 hours .... I had to finally terminate it. Number of rounds for 2^31 = 2147483648 ( two billion one hundred forty-seven million four hundred eighty-three thousand six hundred forty-eight ). So the password hash will be generated after 2147483648 rounds, which requires more than 6 hours ... Next time the user tries to login to the system, he needs to wait for more than 6 hours for the hash to be computed and then match it with the one stored in /etc/shadow or /etc/passwd file .

Once the password hashing settings are changed, the existing passwords are not automatically re-hashed. In order to enforce this and close the vulnerability gap, you need to force the users to change the password.

Force users to change password on next login:
passwd -f <user-name>

Once the password is changed, the updated hash in the /etc/shadow or /etc/passwd file will look something like :
piyush:$6$rounds=85000$JG2mong9$dh/SPT6z07CkWWNorukiJtFeM/dd.H8YmFrodChTpa2zIgajkTVgCfnAusmYMBakFXKCusNr8wF8Ugk8ewmv3.:15 

The entire process of increasing rounds is known as "Key stretching" - which helps in making a weak password more secure to brute-force attacks, by increasing the time needed to test each key.

How to increase password hashing security on linux

"Warranty void if this seal is broken", that's a common line on any newly purchased electronic device. So if you open the device, its detected. Similar concept applies to world of "Passwords" on a computer. The characters of the plain text password are mixed in using different algorithms to create a hash which is kind of a signature for a stream of data. Another way to explain this according to wikipedia is, "A hash function is an algorithm that transforms (hashes) an arbitrary set of data elements into a single fixed length value (the hash)". So if the original password is "whoami8996" its hash value (using md5sum command on UNIX) is something like "5265638efece6f38bbdc858a5c396fb0", but if I change even one character from the password , its hash will change. These hashing algorithms are designed in such a way that no two different strings will have the same hash value. On Linux/UNIX operating systems you can look at a user's password hash in the /etc/passwd or /etc/shadow file.

This is how a user's account looks like in /etc/passwd file:

piyush:$1$Lq1yUo3c$GF7n.Lwjc0YVhHaYvnawQ1:500:500:piyush:/home/piyush:/bin/bash

Every field is separated by a colon " : " and the second field is the hash value of the user's password. Note: An x character instead of the hash indicates that encrypted password is stored in /etc/shadow file. One good thing about the hash is, its of same length for passwords of different lengths ( using the same algorithm to create a hashed value) . In above case MD5 algorithm is used to create the hash. How did I know that ??? Lets try to analyze the hash- $1$Lq1yUo3c$GF7n.Lwjc0YVhHaYvnawQ1.

Every hash has a unique identifier string, like $1$ at the start of the hash in above case indicates that the hash was created using MD5 algorithm. Below table provides the list of algorithms and their identifier strings :

Alogrithm usedHashed value starts with
BSDi_
MD5$1$
Blowfish$2$, $2a$, $2x$ or $2y$
NT Hash$3$
SHA1$4$
SHA2 (256 or 384 bits)$5$
SHA2 (512 bits)$6$

In the above table, algorithms are listed in the order starting with weakest (prone to attack or more vulnerable to compromise) to strongest ( no known attacks or require very long time to attack/compromise using methods like brute force ). Some common password hashing schemes only process the first eight characters of a user's password, which reduces the effective strength of the password. So how do you update the hashing algorithm used ?

Detect hashing algorithm used :
#authconfig --test | grep hashing
Sample output: password hashing algorithm is md5
Another way to detect:
egrep "password .* pam_unix.so" /etc/pam.d/system-auth-ac | egrep "sha256" | egrep -v "^[ ]*#"
The above command needs to be altered according the linux distribution used. Below are some files to look for:
/etc/pam.d/common-password (Debian)
/etc/default/password OR /etc/default/passwd (SUSE/Novell)
/etc/pam.d/system-auth-ac (Red Hat Enterprise Linux - RHEL)
/etc/security/policy.conf (Oracle Solaris)
/etc/security/login.cfg (IBM AIX)
Update the hashing algorithm (RHEL only, for others try editing the files above):
#authconfig --passalgo=sha512 --update
The above update will be applicable only for those users who will change their passwords post the setting update. Existing users who have not changed their password, will still continue to use the previously set hashing algorithm. However we can enforce the users to change their passwords on next login by setting the password expiry age to 0 days for a required user.
Force user to change password:
#chage -d 0 user-name
OR
#passwd -f user-name

Update password hashing algorithm for Linux / Unix

DB2 databases can be configured for different logging mechanisms like circular and archival logging. These mechanisms can be changed for a database at any point after the database is created. By default while creating a database in IBM DB2, db logging method is set to "Circular" logging which is generally not used in production environments. Archival logging is the recommend logging type for DB2 databases, since with this type of logging, one can recover/restore the database to a specific point in time or to the end of logs.

How to change the logging type from circular to archival and vice-verse. From you DB2 server machine start the DB2 control center. (DB2CC).

Step 1: Start -> All Programs -> IBM DB2 -> DB2COPY1 (or which ever is default) -> General Administration Tools -> Control Center


Step 2: Now right click on the required database ( TC or TC2 ) for which the database logging mechanism needs to be changed.


Step 3: After clicking the "Configure Database Logging" option, a wizard will open up that guides you to change the logging type. Select Archive logging and click next.

As you can see the clear difference between Circular and Archive logging types. Circular logging provides automatic log file management ( DB2 application will never run out of log space ). Below table mentions the pros and cons.

TypeOnline backupsTable space backupsRecover to any point in timeAutomatic log file managementPerformanceMaintenance
Circular LoggingNoNoNoYesHighLess compared to circular
Archive LoggingYesYesYesNoReduced than circularMore compared to circular

Step 4: Specify the log archiving details like archived logs location , whether you want DB2 to automatically archive logs etc... and click next


Step 5: Specify the number of primary and secondary log files to maintain and size of each log file in 4K pages. So the total disk space needed in KB will be ( no. primary logs * no. secondary logs * size of each log file * 4  ). Now click next


Step 6: Fill details for the archive path location and if you want to mirror/backup the archived logs also... Click next


Step 7: Because you are changing the logging type from circular to archive logging, a full database backup will be performed , specify the backup file destination and the backup options like parallelism, compression etc ...

Once done no need to enable scheduling at next step. Just click next and then verify the changes in last step before clicking the finish button.


Alternatively you may also run the below command from the DB2 prompt (db2cmd found in the <db2 install path>\bin)

CONNECT TO TC2;
QUIESCE DATABASE IMMEDIATE FORCE CONNECTIONS;
UNQUIESCE DATABASE;
CONNECT RESET;
UPDATE DB CFG FOR TC2 USING logarchmeth1 "DISK:c:\ibm" logprimary 15 logsecond 4 logfilsiz 1024;
BACKUP DATABASE TC2 TO "C:\IBM" WITH 2 BUFFERS BUFFER 9 PARALLELISM 1 WITHOUT PROMPTING;

Note: Either run each above command after typing db2 on the db2cmd command prompt or copy the above code into a text file and save it as a .sql file. On windows run:
db2cmd /c /w db2 -v -tf "<full path to the .sql file>"
On linux login on to the machine with the required instance username,password and then run:
sh -c db2 -v -tf "<full path to the .sql file>"

Changing DB2 Database logging methods

The installer program for IBM WebSphere Application Server uses the InstallShield MultiPlatform (ISMP) program to install the software. During the course of installation , ISMP maintains a record installed applications. In order to create a platform independent record maintenance , it uses a file named .nifregistry or vpd.properties to list program components that are currently installed. These files help ISMP and the installer program to recognize previous installations of WebSphere product family and control options for new installations. Lets try to find the footprints of Websphere products using nifregistry.
Sample entries of a .nifregistry :

<?xml version="1.0" encoding="UTF-8"?><!--Do not delete this file.  It is for IBM WebSphere Application Server internal use.-->
<nifregistry>

    <pak installrooturi="file:///C:/Program%20Files/IBM/WebSphere/AppServer/" name="was.cim.lang.zh.pak" paklocationuri="zip:///C:/Program%20Files/IBM/WebSphere/AppServer/properties/version/nif/backup/was.cim.lang.zh.pak" productid="BASE"/>
    <pak installrooturi="file:///C:/Program%20Files/IBM/WebSphere/AppServer/" name="was.cim.lang.zh_TW.pak" paklocationuri="zip:///C:/Program%20Files/IBM/WebSphere/AppServer/properties/version/nif/backup/was.cim.lang.zh_TW.pak" productid="BASE"/>
    <product installrooturi="file:///C:/Program%20Files/IBM/WebSphere/AppServer/" lastvisited="2012-08-02 04:10:44-0700" productid="BASE" version="7.0.0.0"/>

    <pak installrooturi="file:///C:/Program%20Files/IBM/WebSphere/AppServer/UpdateInstaller/" name="updi.primary.pak" paklocationuri="zip:///C:/Program%20Files/IBM/WebSphere/AppServer/UpdateInstaller/properties/version/nif/backup/updi.primary.pak" productid="UPDI"/>
    <product installrooturi="file:///C:/Program%20Files/IBM/WebSphere/AppServer/UpdateInstaller/" lastvisited="2012-08-07 23:16:13-0700" productid="UPDI" version="7.0.0.23"/>

</nifregistry>

For a particular product the .nifregistry file contains one entry (line) each for every PAK that gets installed and one entry (line) for the product offering (e.g. WebSphere Business Integration, Enterprise Service Bus etc.)

.nifregistry is an xml file will all entries enclosed in <nifregistry> tag.
Entries of product specific binaries (.pak files) enclosed in <pak> tag , followed by actual <product> tag. In the above sample we have 2 product tags for BASE and UPDI being installed. BASE is for IBM Websphere Application Server and UPDI is for IBM Websphere Update Installer.

<product> tag specifies the install location , productid and version of the product. <pak> tags are similar to the details of product specific jar (JAVA application)

Another important aspect of the nifregistry is it uses URL format for the install locations ... for eg : installrooturi="file:///C:/Program%20Files/IBM/WebSphere/AppServer/ includes %20 instead of a "space" and forward slashes in paths.
After uninstalling a particular product ISMP removes the necessary lines from the nifregistry.Location of the .nifregistry file varies with operating system , however the format of entries inside the file is constant and independent of operating system.

Operating SystemLocation of nifregistry
WindowsC:\Windows\.nifregistry
Linux/opt/.ibm/.nif/.nifregistry
AIX/usr/.ibm/.nif/.nifregistry
HP-UX/opt/.ibm/.nif/.nifregistry
Solaris/opt/.ibm/.nif/.nifregistry

Using the above data we can write a discovery code to find out all machines with Websphere family products installed.

Important Note: Starting Websphere Application Server 8 nifregistry is no more available. Instead one can use .was.installlocations.registry file located at the same location of .nifregistry as mentioned in the above table.

Related stuff : Deploying Webpshere Application Server using Tivoli Endpoint Manager (BigFix)

How to find out IBM WAS installations on a target machine

+